Moodle follows a very specific pattern for activity modules:
- User selects a course
- User turns editing on
- User selects a topic or week
- User selects an activity to add
In this post we will go over the purpose of the form, how to customize the form, and how to handle the pre/post processing of data in the form.
NOTE: During this exercise, we will also have to modify our
module's database structure. We will cover these steps in detail in a separate post.
module's database structure. We will cover these steps in detail in a separate post.
We will start by examining our mod_form.php file. Bascially, it generates a new form that is based on the Moodle Form module (notice at the top of the file, it "extends moodleform_mod").
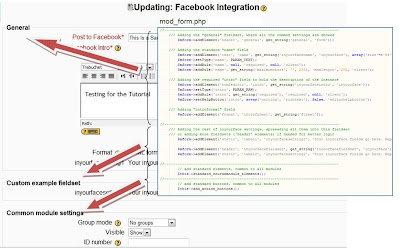
The form is divided into 3 basic sections:
1. GENERAL: Elements required for every activity type
2. CUSTOM: Elements required by our module
3. STANDARD: Elements that are common to all modules
These sections correlate to the following areas of the activity creation form (the form that comes up after the user chooses to add an activity to a course's section or topic):
Click Image to Zoom
For our module, we will create a single custom element. A simple drop down where the user can select the number of forum posts that the student can submit using our Module.
We will only concentrate on the custom section o four mod_form.php script. Open the file for editing and find the following section:
EDITING .\mod\inyouface\mod_form.php


//-------------------------------------------------------------------------------

/// Adding the rest of inyourface settings, spreeading all them into this fieldset

/// or adding more fieldsets ('header' elements) if needed for better logic

$mform->addElement('static', 'label1', 'inyourfacesetting1', 'Your inyourface fields go here. Replace me!');


$mform->addElement('header', 'inyourfacefieldset', get_string('inyourfacefieldset', 'inyourface'));

$mform->addElement('static', 'label2', 'inyourfacesetting2', 'Your inyourface fields go here. Replace me!');


//-------------------------------------------------------------------------------
We actually start by modifying the .\mod\inyourface\lang\en_utf8\inyourface.php file! We need to change the "inyourfacefieldset" variable. Open the file in your editor and change that variable to "Feed Options".
We will also add one more variable that we'll use as a label for our dropdown list.
The completed inyourface.php file will look like this when you are done, with our changes in red:
EDITING \lang\en_utf8\inyourface.php


<?php

    $string['inyourface'] = 'Facebook Integration';

    $string['modulename'] = 'Facebook Integration';

    $string['modulenameplural'] = 'Facebook Integration';

    $string['inyourfacefieldset'] = 'Feed Options';

    $string['inyourfaceintro'] = 'Post to Facebook Intro';

    $string['inyourfacename'] = 'Post to Facebook';

    $string['postlimit'] = 'Maximum Posts';

?>
We can now concentrate on the form itself. We start by commenting out the annoying labels - label1 and label2 that the NEWMODULE template uses as a place holder. Comment out these lines, so your mod_form.php custom block now looks like this:
EDITING .\mod\inyouface\mod_form.php


//-------------------------------------------------------------------------------

/// Adding the rest of inyourface settings, spreeading all them into this fieldset

/// or adding more fieldsets ('header' elements) if needed for better logic

/// $mform->addElement('static', 'label1', 'inyourfacesetting1', 'Your inyourface fields go here. Replace me!');


$mform->addElement('header', 'inyourfacefieldset', get_string('inyourfacefieldset', 'inyourface'));

/// $mform->addElement('static', 'label2', 'inyourfacesetting2', 'Your inyourface fields go here. Replace me!');


//-------------------------------------------------------------------------------
That leaves one active line of code in the block - the one that adds the header element to our block. We want to add our drop down list immediately below the header. When we are finished our custom block will look as follows:
EDITING .\mod\inyouface\mod_form.php


//-------------------------------------------------------------------------------

/// Adding the rest of inyourface settings, spreeading all them into this fieldset

/// or adding more fieldsets ('header' elements) if needed for better logic

/// $mform->addElement('static', 'label1', 'inyourfacesetting1', 'Your inyourface fields go here. Replace me!');


$mform->addElement('header', 'inyourfacefieldset', get_string('inyourfacefieldset', 'inyourface'));/// $mform->addElement('static', 'label2', 'inyourfacesetting2', 'Your inyourface fields go here. Replace me!');


$choices = array();

$choices[0] = 1;

$choices[1] = 2;

$choices[2] = 3;

$mform->addElement('select', 'postlimit', get_strin('postlimit','inyourface'), $choices);
WE CAN NOW CHECK THE EFFECT OF OUR CHANGES
TO THE MODULE'S FORM.
TO THE MODULE'S FORM.
THAT'S COMING UP NEXT!
Next Article in Series


The last code line: $mform->addElement('select', 'postlimit', get_strin('postlimit','inyourface'), $choices);
ReplyDelete"get_strin" should be "get_string".