GETTING STARTED


One of the challenges in Moodle development is finding a good starting point for creating a Moodle plug-in. I thought it would be cool to build a step-wise tutorial on the subject as I embark on a personal whim:

Building a Moodle Module that allows the Student to post their Moodle Forum posts to FaceBook, and elicits responses from their group of friends into a totally separate forum. Perhaps too ambitious for a first project, but it hits all of the major challenges.

I will start by coming up with a cool name for the plug-in. I am thinking of calling it InYourFace ?  This particular exercise will focus on building an activity module - a module that provides an activity that can be added to any Moodle course.

WHERE DO WE START?

NOTE: This tutorial assumes that you already have a working installation of Moodle 1.9.x available, and that you have at least one course installed in your Moodle instance.  It also assumes that you have some basic knowledge of PHP and MySQL.

Before we embark on writing our first Moodle module, let's download a template provided by the folks at Moodle.org. In our case, we will be writing our module for Moodle version 1.9.x:

Download Link for The Module Template for Moodle 1.9

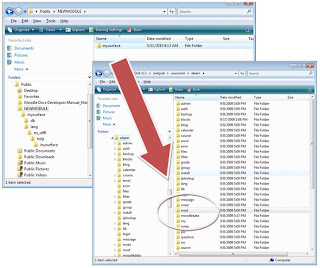
We end up with a file called NEWMODULE.zip which we need to save to our local drive and unzip. In my case, I download to the Public folder, unzip the file and end up with .\Public\NEWMODULE.

NEXT ARTICLE IN SERIES
Showing posts with label moodle. Show all posts

Thursday, May 13, 2010

08MOD: Moodle Module Development - Generate Upgrade snippet with XMLDB Editor

TO START THE TUTORIAL FROM THE BEGINNING, CLICK HERE

During our initial setup of the Module we modified the install.xml file.  We are now faced with a dillema - while modifying the module's form we introduced a new database column.  This value is needed by the module's logic and needs to be saved to our inyourface table (mdl_inyourface if your installation uses the default table prefix).

To handle this new challenge, we have to set up our first module upgrade.  We accomplish the upgrade by following a number of simple steps:

  • We generate XMLDB code that we use in our module's .\mod\inyourface\db\upgrade.php script
  • We paste the new code into the upgrade.php script
  • We update our .\mod\inyourface\version.php file
  • We run notifications from the Moodle admin menu

When we finish these steps, we can verify that our changes took effect by changing the Post Limit value in our module's form, and making sure that the change took place.


07MOD: Moodle Module Development - Testing the module's form

TO START THE TUTORIAL FROM THE BEGINNING, CLICK HERE

We have just completed our changes to the module's form.  This form is called when the user adds our activity to a Moodle course.  Let's test the form, and make sure that it works correctly.
 
1. Let's navigate to a Moodle course

Click Image to Zoom

06MOD: Moodle Module Development - The module's form

TO START THE TUTORIAL FROM THE BEGINNING, CLICK HERE

Moodle follows a very specific pattern for activity modules:
  • User selects a course
  • User turns editing on
  • User selects a topic or week
  • User selects an activity to add
Once the activity has been selected from the dropdown box, the module's form is displayed.  In our case, selection of the "Facebook Integration" activity calls the form described in the .\mod\inyourface\mod_form.php script.

05MOD: Moodle Module Development - The module's language file

TO START THE TUTORIAL FROM THE BEGINNING, CLICK HERE

When we first set our module up, we simply completed a series of search & replace for the the phrase "NEWMODULE" and replaced them with our Module's name. This is enough to get the Module registered, but it leaves a very ugly footprint in Moodle.

Wednesday, May 12, 2010

04MOD: Moodle Module Setup - Adding our Activity


Now that we have a module that does absolutely nothing, let's add it to a course. This will give us some confidence on the plug-in architecture, and give us some visual cues on where we need to go as we beef up the module.

So. . .

Let us proceed and add our non-activity module to a course!!!! Hurrah!

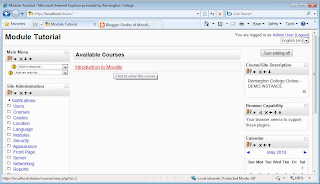
Now that the module is installed, we can navigate to a course:


Click Image to Zoom

03MOD: Moodle Module Setup - Test Initial Changes to Template

TO START THE TUTORIAL FROM THE BEGINNING, CLICK HERE

So far...

We have modified the files in the module template, replacing any references to NEWMODULE with our module's name.

It is now time to make sure we didn't miss any of the changes:
  • We rename the directory that has been holding our files (NEWMODULE) to our module's name (inyourface).
  • We copy the entire contents of our module to our Moodle .\mod directory


Click Image To Zoom


02MOD: Moodle Module Setup - Replacing the Module Name

TO START THE TUTORIAL FROM THE BEGINNING, CLICK HERE

After the install.xml file has been updated, it is time to update all references to NEWMODULE in the template, and replace them with our own module's name. In this case, we will replace all references to NEWMODULE to inyourface.


Tuesday, May 11, 2010

01MOD: Moodle Module Setup - The install.xml file

TO START THE TUTORIAL FROM THE BEGINNING, CLICK HERE

We have just finished upacking our Moodle Module Template!

If we inspect the contents of our new directory, it's really not very assuming:


FIRST ORDER OF BUSINESS - MAKE THE PLUG-IN PLUGGABLE!


STEP 1 - the install.xml file
A plug-in is only a plug-in if we have "plugged it in". In Moodle, we accomplish this by registering the Module in the Moodle database. Towards this end, we focus on a single file in the package - the install.xml file.


It is located in the .\NEWMODULE\db\ directory.


So, I load it up in my trusty Notepad++ (here's a gratuitous plug for this great GPL editor: Notepad++ Home Page) and notice that install.xml is nothing but an XMLDB file. The file should something like this when you load it into your editor:


Click Image To Zoom


THE MODULE'S XMLDB FILE CAN BE EDITED USING MOODLE'S XMLDB EDITOR

This is the preferred method, and is covered in the post listed below. The editor is available after the module has been copied to the Moodle .\mod directory, so instructions for modifying the file manually are also provided below.


To learn a little about the XMLDB editor, VISIT THE XMLDB EDITOR ARTICLE.


TO EDIT THE XMLDB FILE MANUALLY:

I run a search & replace for the word "newmodule" and replace it with my module's name: inyourface. For version 1.9, it should result in 12 replacements.

We can also change the comments in the file, but we will save that for later. Before we can test our module, we still have a little more work to do!!! We will cover these steps in the next post.

CONTENTS OF install.xml after changes:
<?xml version="1.0" encoding="UTF-8" >
<XMLDB PATH="mod/inyourface/db" VERSION="20070401" COMMENT="XMLDB file for Moodle mod/inyourface"
xmlns:xsi=http://www.w3.org/2001/XMLSchema-instance
xsi:noNamespaceSchemaLocation="../../../lib/xmldb/xmldb.xsd"
>
<TABLES>
<TABLE NAME="inyourface" COMMENT="Default comment for inyourface, please edit me">
<FIELDS>
<FIELD NAME="id" TYPE="int" LENGTH="10" NOTNULL="true" UNSIGNED="true" SEQUENCE="true" ENUM="false" NEXT="course"/>
<FIELD NAME="course" TYPE="int" LENGTH="10" NOTNULL="true" UNSIGNED="true" DEFAULT="0" SEQUENCE="false" ENUM="false" COMMENT="Course inyourface activity belongs to" PREVIOUS="id" NEXT="name"/>
<FIELD NAME="name" TYPE="char" LENGTH="255" NOTNULL="true" SEQUENCE="false" ENUM="false" COMMENT="name field for moodle instances" PREVIOUS="course" NEXT="intro"/>
<FIELD NAME="intro" TYPE="text" LENGTH="medium" NOTNULL="false" SEQUENCE="false" ENUM="false" COMMENT="General introduction of the inyourface activity" PREVIOUS="name" NEXT="introformat"/>
<FIELD NAME="introformat" TYPE="int" LENGTH="4" NOTNULL="true" UNSIGNED="true" DEFAULT="0" SEQUENCE="false" ENUM="false" COMMENT="Format of the intro field (MOODLE, HTML, MARKDOWN...)" PREVIOUS="intro" NEXT="timecreated"/>
<FIELD NAME="timecreated" TYPE="int" LENGTH="10" NOTNULL="true" UNSIGNED="true" DEFAULT="0" SEQUENCE="false" ENUM="false" PREVIOUS="introformat" NEXT="timemodified"/>
<FIELD NAME="timemodified" TYPE="int" LENGTH="10" NOTNULL="true" UNSIGNED="true" DEFAULT="0" SEQUENCE="false" ENUM="false" PREVIOUS="timecreated"/>
</FIELDS>
<KEYS>
<KEY NAME="primary" TYPE="primary" FIELDS="id" />
</KEYS>
<INDEXES>
<INDEX NAME="course" UNIQUE="false" FIELDS="course"/>
</INDEXES>
</TABLE>
</TABLES>
<STATEMENTS>
<STATEMENT NAME="insert log_display" TYPE="insert" TABLE="log_display" COMMENT="Initial insert of records on table log_display. Each record describes how data will be showed by log reports.">
<SENTENCES>
<SENTENCE TEXT="(module, action, mtable, field) VALUES ('inyourface', 'add', 'inyourface', 'name')" />
<SENTENCE TEXT="(module, action, mtable, field) VALUES ('inyourface', 'update', 'inyourface', 'name')" />
<SENTENCE TEXT="(module, action, mtable, field) VALUES ('inyourface', 'view', 'inyourface', 'name')" />
</SENTENCES>
</STATEMENT>
</STATEMENTS>
</XMLDB>


NEXT ARTICLE IN SERIES

00MOD: Developing Moodle Modules

One of the challenges in Moodle development is finding a good starting point for creating a Moodle plug-in. I thought it would be cool to build a step-wise tutorial on the subject as I embark on a personal whim:

Building a Moodle Module that allows the Student to post their Moodle Forum posts to FaceBook, and elicits responses from their group of friends into a totally separate forum. Perhaps too ambitious for a first project, but it hits all of the major challenges.

I will start by coming up with a cool name for the plug-in. I am thinking of calling it InYourFace ?  This particular exercise will focus on building an activity module - a module that provides an activity that can be added to any Moodle course.